I’m working on a new Podcast app. It all started when my favourite podcast app stopped working. The app relied on a server to work and the company that owned the app (it has been sold in the meantime) was not able to maintain the server when problems occurred. Even basic functions, like exporting the list of subscriptions, were relying on the server connection. As I loved the features of that app and the uncertain future of it made me start developing my own app. As there are already a lot of apps existing, I have the opportunity to compare what other developers are doing and get inspired for my own app.
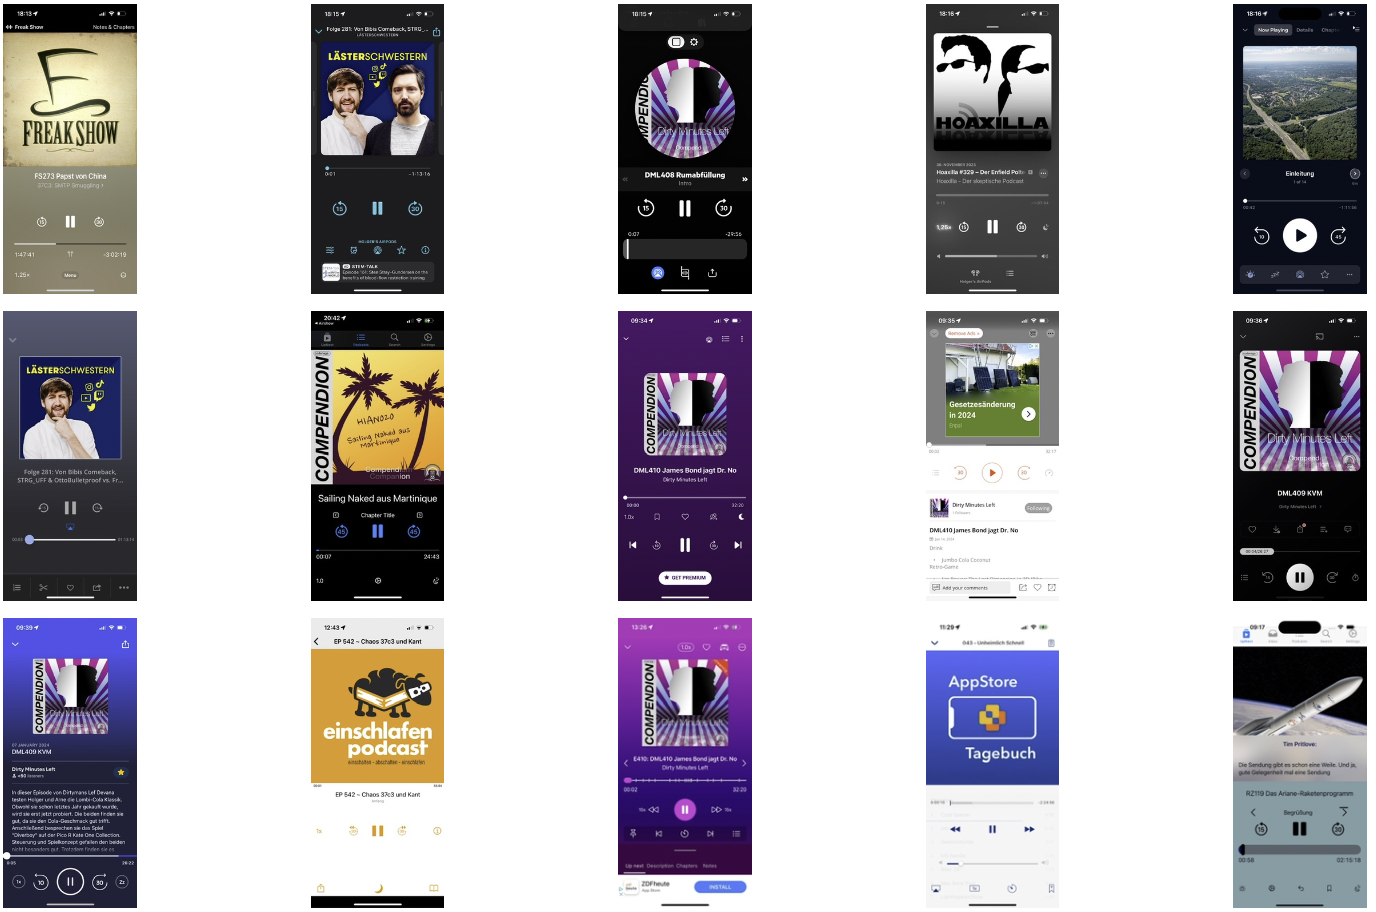
When designing an app, besides selecting the set of features that should be implemented, a big decision ist on designing the user interface. The “play now screen” the screen that shows the player controls when the app is in foreground is one of the most important screens of a player app. Let’s have a look at the new screen I designed for my app. Some items will still change in the future, but I think it’s good to discuss my thoughts when designing the interface:
The now playing screen shows the cover art of the episode on the top. A big portion of the screen is dedicated to this. A lot of podcasters spend time designing and selecting special art for each episode. By giving the cover that much space, I hope the user has a similar feeling as people have when holding big vinyl covers.
The app supports some podlove features. This includes transcripts. If an episode contains a transcript as vtt file. Its content is loaded and can be seen during playback overlayed on the cover art.
The app also supports chapter marks. At the moment of writing this, podlove simple chapters as part of the feed, and mp4 chapters are supported. I’m working on mp3 chapters as well. In addition, some podcasters don’t put proper chapter marks, but list them in their show notes. These are extracted and can be also used to skip chapters. The ‘next chapter’ button contains a progress bar going around the chapter and showing when this chapter is ending.
The duration for the seek forward and backwards buttons are individually adjustable.
The bottom row of icons will be consolidated in the further development. I will explain the function of these icons in a separate posting.
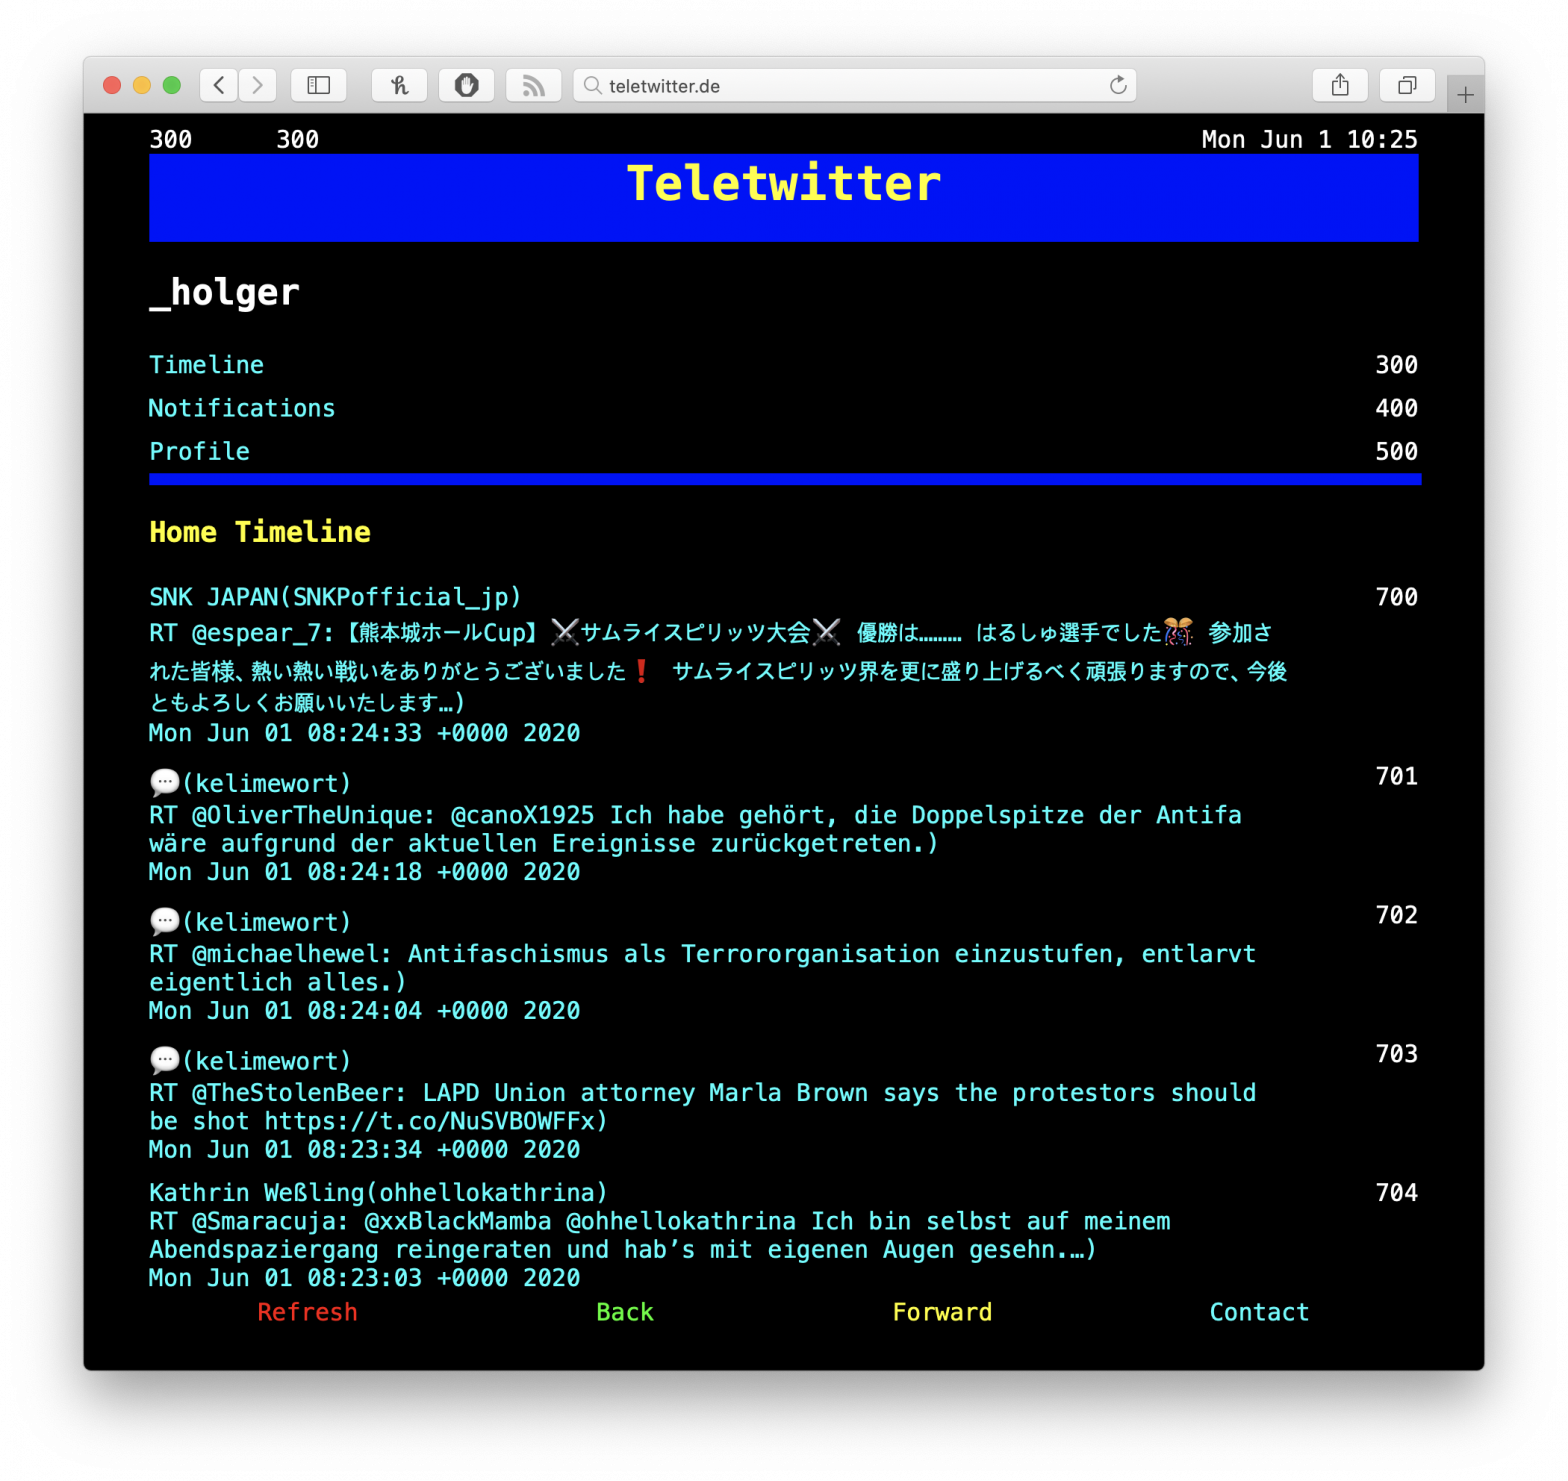
Ja, das ist total bekloppt. Nein, es hat keinen Mehrwert. Ich habe es nur gebaut, weil ich mal mit der Twitter API spielen wollte. Ja, ich weiß es ist nicht 100%ig wie viele Videotext, ja, nicht alles funktioniert, nein, man kann es (vermutlich) nicht mit Mobilgeräten ohne Tastatur benutzen.
Nachdem das geklärt wäre, kommen wir dazu worum es eigentlich geht: Ich habe einen Web-Twitterclient gebaut, der aussieht wie Videotext und sich auch teilweise so verhält. Seit 40 Jahren gibt es in Deutschland den Videotext (eng. Teletext). Videotext ist eine Funktion, die es auch heute in modernen Fernsehern gibt. Man kann ihn über die Videotext taste (meist ein kleiner Bildschirm mit Strichen drin) aufrufen, hier über Seiten mit dreistelligen Seitenzahlen (100-899) navigieren. Die Seiten werden über das normale TV-Signal ausgegeben. TV Geräte mussten früher durch alle Seiten durchblättern um die richtige Seite zu finden. Auf die ganzen technischen Details und die Tatsache, dass modernere Geräte Seiten auch zwischenspeicherten, damit der Suchlauf nicht so lange dauerte und man direkt zu Seiten springen kann, gehe ich jetzt nicht ein. Das kann sicher auf Wikipedia oder so nachgelesen werden. Jedenfalls habe ich einen Twitterclient gebaut der sich ähnlich verhält.
Statt zu klicken muss man bei teletwitter Seitenzahlen eingeben. Um die Timeline der Nutzer darstellen zu können, ist ein sog. Token nötig, den man von Twitter bekommt, wenn der User den Zugriff erlaubt. Das passiert über das bekannte “Authorize App” direkt von Twitter. Wenn der User nicht eingeloggt ist, muss er hier Username und Passwort eingeben. Das Passwort wird dabei nie an die anfragende App (hier teletwitter) übertragen.
Leider kann ich nicht bestimmen, welche Funktionen ich mit dem Token, den ich übertragen bekomme ausführen kann. Die Liste ist daher sehr lang, auch wenn ich derzeit nur die Timeline, die Notifications und das Benutzerprofil einlese und darstelle.
Anyway. Nach dem Autorisieren bekomme ich von Twitter einen Token und einen Verifikation-schlüssel. Beides sind lange Zeichenketten. Den Verifikationsschlüssel muss ich nochmal gegen einen anderes Secret austauschen und dann ist der Nutzer eingeloggt. Die Details kann man bei Twitter selber nachlesen. Wichtig ist mir klarzustellen, dass ich keine Passwörter zusehen bekomme.
Diese Token speichere ich in einer PHP $_SESSION Variablen ab. Diese Variablen sind nur für eine gewisse Zeit gültig. Jeder Benutzer von Teletwitter bekommt im Hintergrund eine eigene Session ID, der diese Variablen zugeordnet sind. Wer mehr über Sessions erfahren will, kann das hier nachlesen. Diese Token werden zur Identifikation bei Twitter benutzt. Ich schicke also eine Anfrage hin und übergebe dabei die Tokens um den Benutzer, für den ich die Anfrage stelle, zu identifizieren. Twitter schickt mir darauf hin eine Antwort. Bei Teletwitter auf Seite 300 schicke ich z.B. die Anfrage “get(“statuses/home_timeline”, [“count” => 200, “exclude_replies” => true])” um 200 Tweets aus der Hometimeline des Benutzers zu bekommen. Twitter antwortet daraufhin mit diesen Tweets, die ich auch in einer Session-Variablen abspeichere. die ersten 5 davon zeige ich auf Seite 300 an. Wenn man auf Seite 301 geht, kommen die nächsten 5, ohne dass ich eine neue Anfrage an Twitter stelle. Das geht so weiter bis Seite 340. Was auf Seite 341 passiert, weiß ich tatsächlich gerade nicht. Muss ich mal ausprobieren. Kommt bestimmt ne Fehlermeldung. Egal. Geht man auf die Seiten 700 bis 799 werden einzelne Tweets aus der selben Variablen angezeigt (ich überlege dies auf Seite 600 bis 799 zu ändern, aber zum Zeitpunkt wo ich das hier schreibe sind es die Seiten 700 bis 799). Seite 400 läd, ähnlich wie Seite 300 neue Tweets in die selbe Variable, hier sind es die Notifications / replys. Diese werden danach über die selben Seiten 700 bis 799 anzeigbar. Und ja, ich weiß, dass das nicht wie bei Videotext ist, wo jede Seite immer den selben Inhalt hatte. Aber Videotext hat auch nicht jedem Benutzer anderen Inhalt gezeigt.
Abschließend gibt’s noch die Seiten 800 und 810, die statische Inhalte, einmal Informationen zu Teletwitter und einmal Kontaktinformationen darstellen.
Für Videotext gab es zusätzlich noch vier farbige Knöpfe auf der TV-Fernbedienung. Mit diesen konnten spezielle Funktionen aufgerufen werden. Diese sind (Stand heute) in Teletwitter noch nicht integriert, vor allem weil Computertastaturen diese farbigen Knöpfe nicht haben. Ich überlege noch wie ich das löse (ggf. mit Mausklicks).
Anyway. Wer das ganze selber installieren oder sich den (vermutlich schrecklichen) Code angucken will, kann das bei GitHub machen.
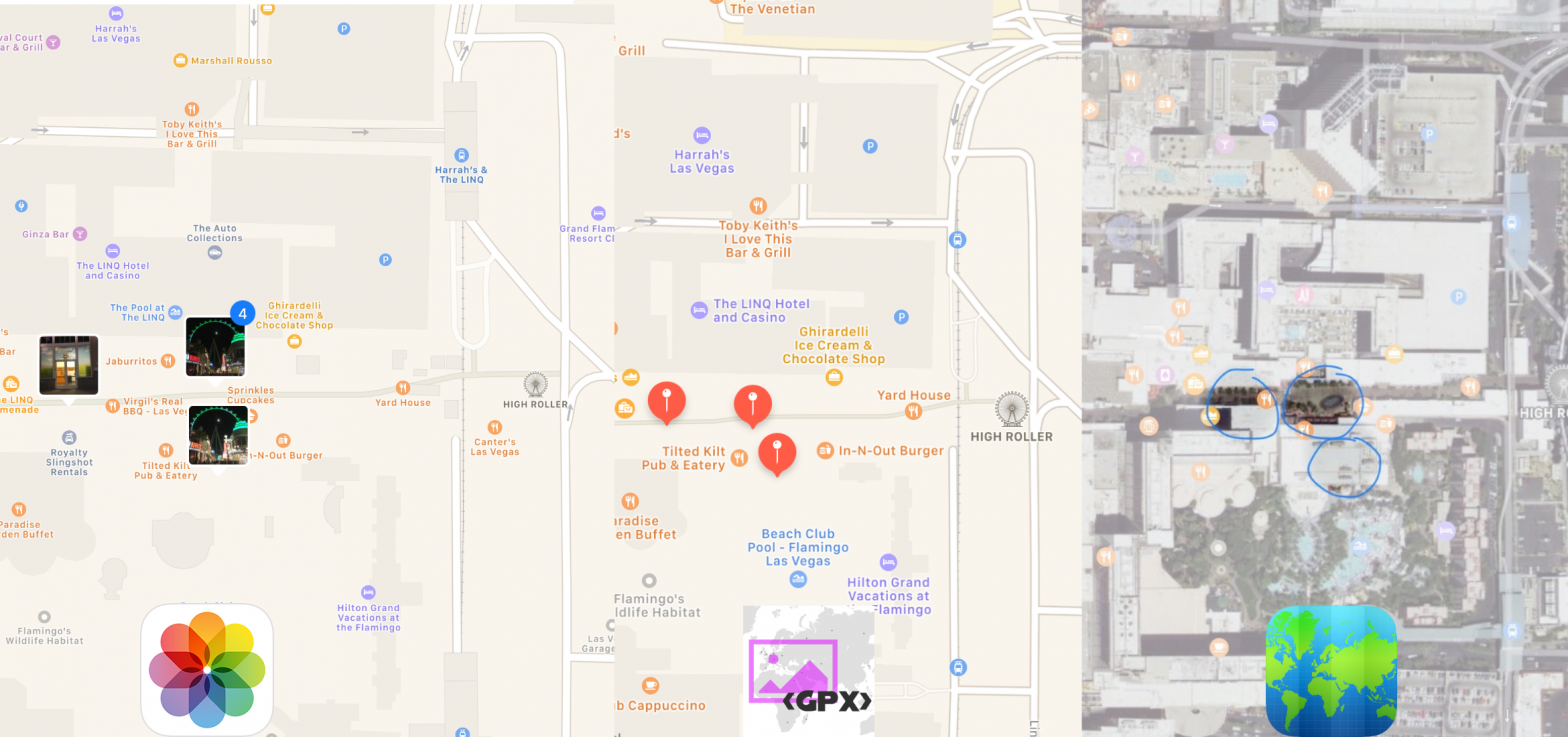
Yeah, another app. A friend told me about Fog of World. That’s an app tracking where in the world you have been and how much of the earth you have seen. It’s a super cool concept and really cool app. Unfortunately it only uncovers the earth from the first start of that app. The developer has thought about it and allows import from other apps in the form of gpx files. So if you track your sports (runs, bike rides, skiing,…) you can export the data and import them into Fog of World. Unfortunately I’ve been to a lot of places where I haven’t done any sports or recorded any tracks. But I took photos. A lot of my photos contain GPS information. So I wanted to create a tool to export the location data form those pictures and import them in Fog of World. And exactly that’s what GPXExporter does. It takes location information from photos and exports a GPX file which can be imported in Fog of World or other apps.
During the development I found out that Fog or World doesn’t like single places (way- or trackpoints) but only repeats ‘real’ tracks. Therefore I had to cheat a bit and put two points where only one should be. So I implemented a jiggle feature which places a second point about 1cm next to the original point. And TADA! it works quite well, as you can see on the header image of this blog post.
You can also export the gpx file to any other iOS app that supports the import of gpx files as well as saving it to iCloud Files, Dropbox or other file syncing services using the iOS Share sheet.
The app looks ugly, it has an ugly icon and only limited functionality. But what it should do, it does. Instead of keeping it for myself I’m giving it to you for one Euro/Dollar/….
And be sure, your location data or your photos are not transferred and used for advertisement. No, you pay $1/1€ and that’s it. No back door. No hidden functionality, no bull shit. Just gpx creation.