Warner, the company owning DC Comics, is currently accepting offers to be bought. DC owns some of the best known superheroes (Batman, Superman, Wonder Woman, the Flash) but fails to deliver movies staring them. Besides the Dark Knight Trilogy most other films and shows failed to be successfully popular. Management interference, a lack of planning, strategy and consistency lead to the downfall of the DCEU. DCs rival Marvel succeeded with their Marvel Cinematic Universe. So just in case someone wants to give me the funds to buy Warner/DC here is my plan to create a content, coherent and entertaining universe using my favorite part of the DC universe: Batman.
(more…)Blog
-
Apple Photos can’t handle RAW
I’ve noticed it and reported it to apple during the macOS 26 developer beta. Unfortunately it has not been solved and I haven’t got any reaction from Apple, so I’m wondering if it’s a macOS bug or a me-Bug (as this should never happen, even a me-bug is a macOS bug here).
I’m shooting JPEG+RAW using my Canon R8 camera. That means for every photo I take, two files are saved. The raw data from the image sensor and a JPEG file that has some automatic adjustments done to it in camera. The JPEG is often good enough to share but for some pictures it’s great to have the flexibility from RAW files.
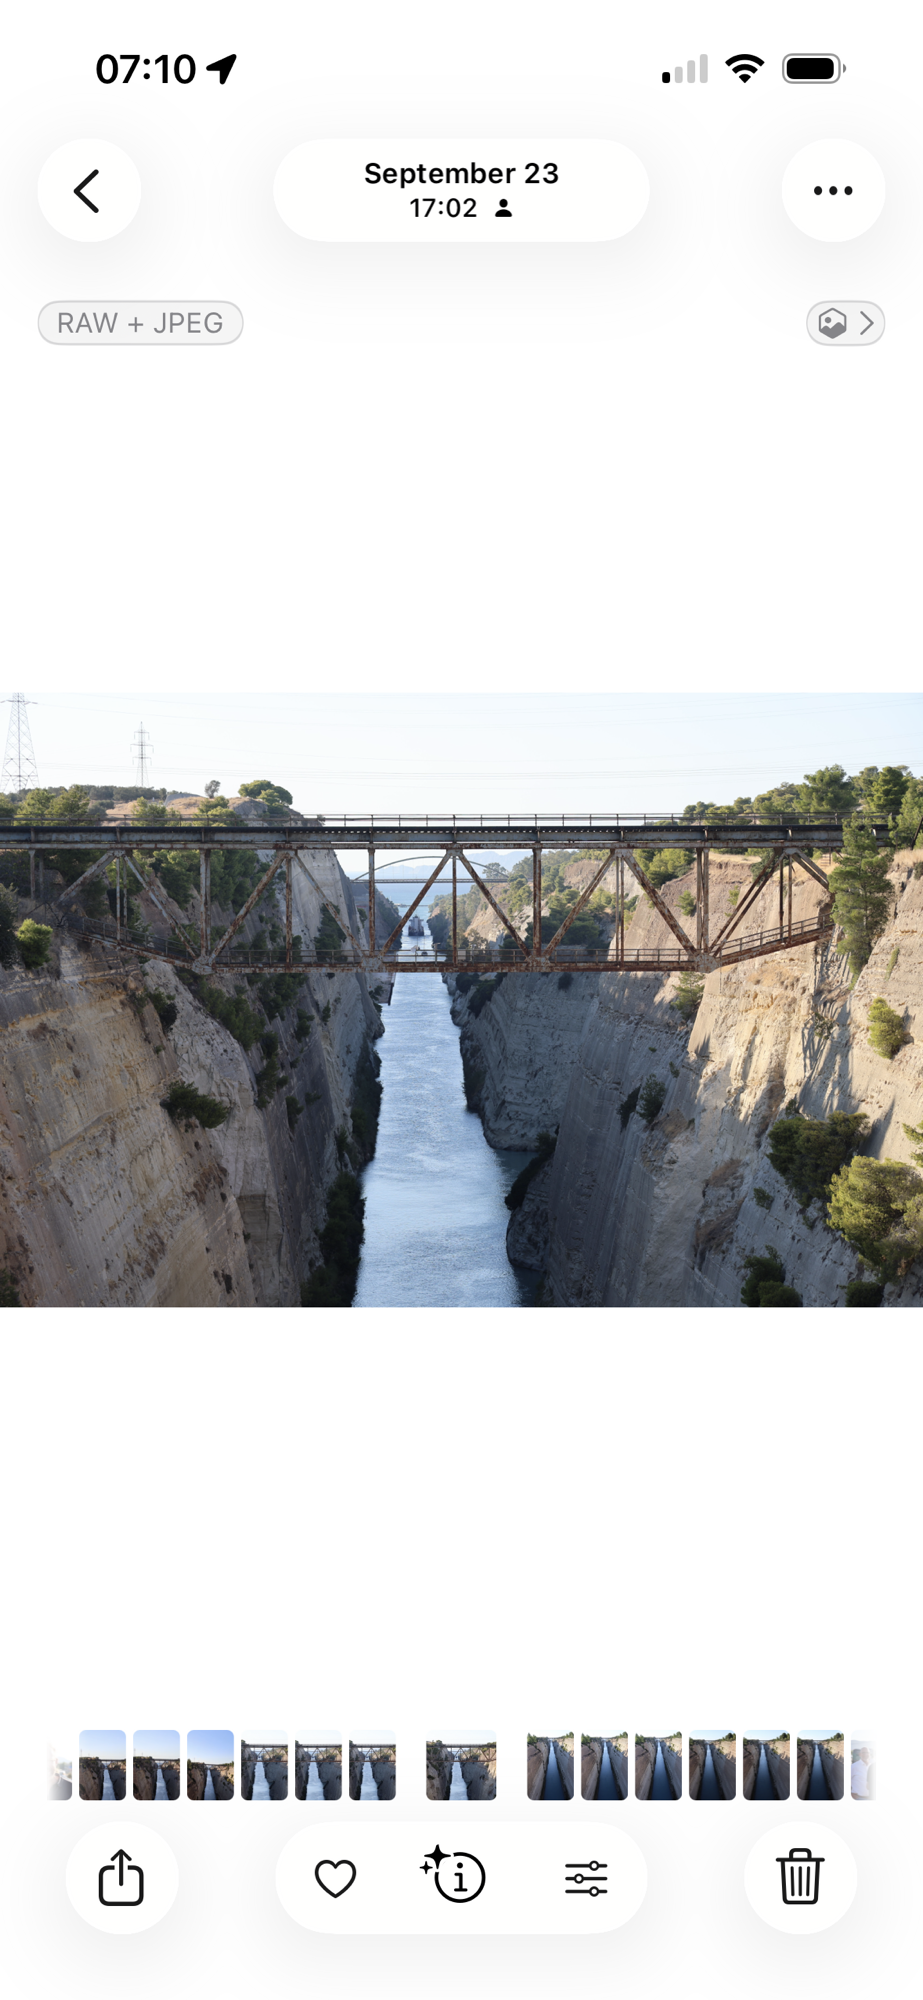
When importing the images to Apple Photos, the App shows one image with the information that there are two files related to it. The user can switch per photo if the JPEG or the RAW should be the “original ” that is used for editing. This can be changed, the original is mentioned first in the photo library icon.
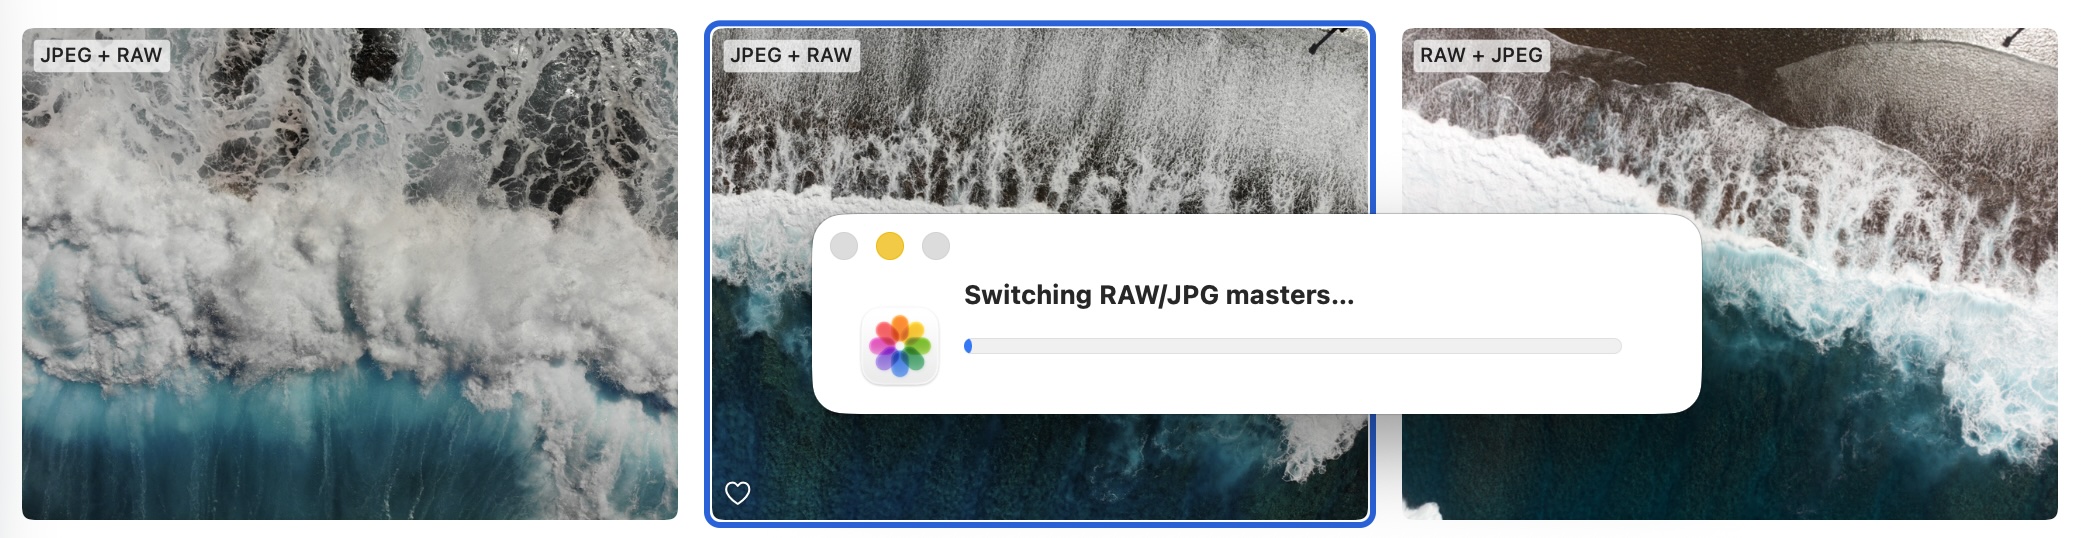
Switching between RAW and JPG When switching from JPEG Original to RAW Original, often (not always) the image looks completely broken. Often it’s just black with pieces of photos in some areas.
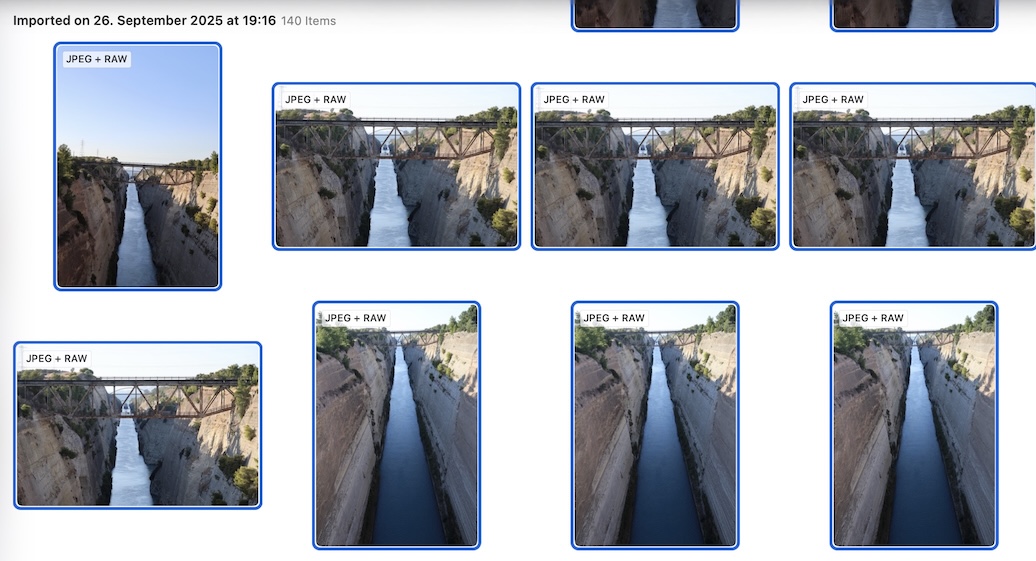
JPEGs 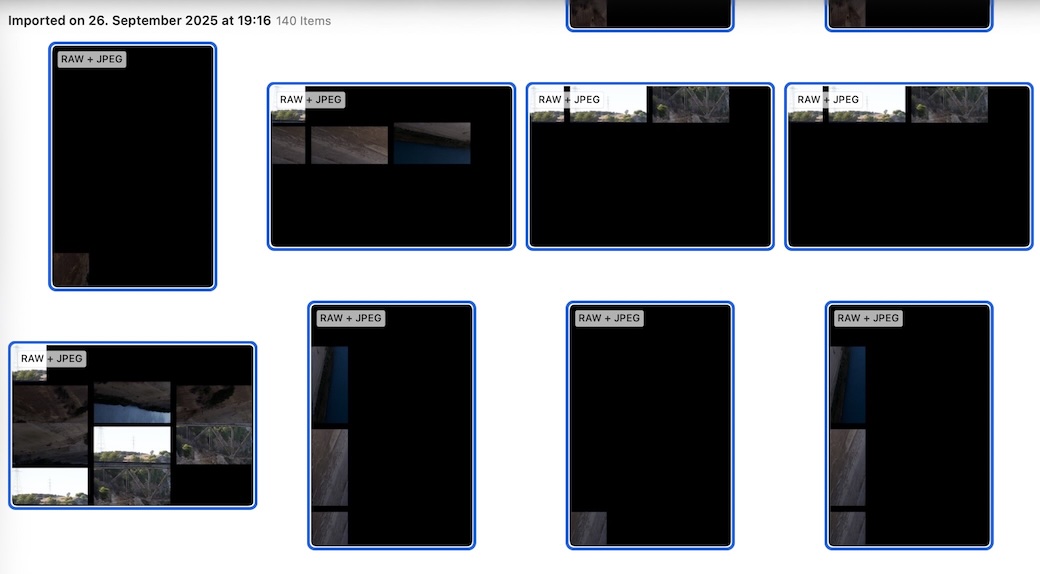
RAWs You could think that the RAW file was destroyed while importing the images, but that’s not the case. In Photos you can go to the source file in the FINDER or export it to a location of your choice. When doing so, you find the RAW file completely intact and can open and edit it with other software without any issue.
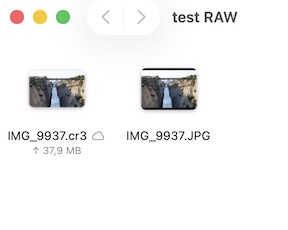
Finder 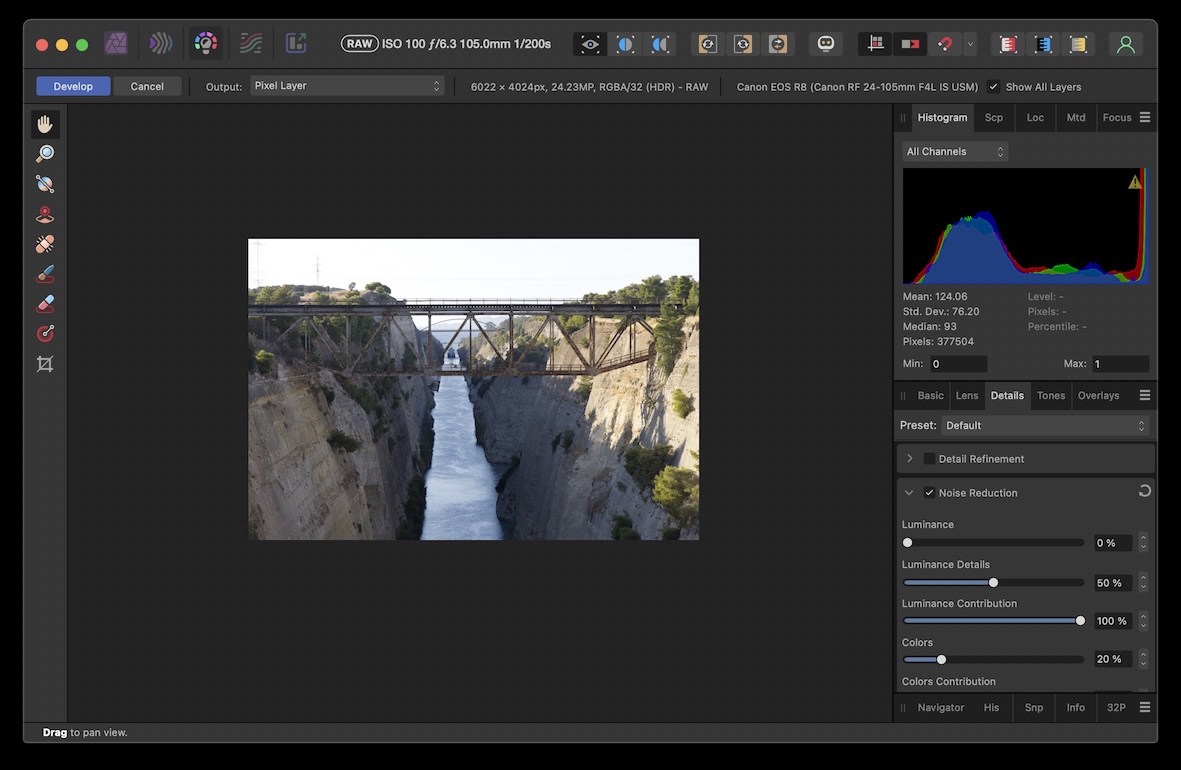
Affinity Photo This is bug in Apple Photos which can’t display the RAW file correctly. This bug has been reported to apple in July 2025 under FB18980689.
Edit: the iPhone Version can display the same images (synced using iCloud Photo Sync) without a problem.
-

Up Next – An Independent Podcast Player
I’ve created a new app that is supposed to launch alongside Apples iOS26 Update. I took what I’ve learned when developing “One Trick Pony” and “Raúl”, applied new Swift6 concurrency rules and modern way of working to build “Up Next”. I’ve been using it already some time now while updating and bugfixing. The app is now ready and I’m waiting for apple to allow the submission of iOS26 apps. Stay tuned – if you are running the iOS26 beta, you can already install the app using TestFlight. Head over to my new Development Website at Extremely Successful Apps.
-
Downloading 2TB from iCloud
How long does it take to download 2TB of iCloud Photos? My Hard drive broke. After buying a new one, I had to download my iCloud Photo Library from Apple (to have a local copy of all my Photos). To see the progress, I wrote a small Shell script that monitored the file size and regularly wrote it into a csv. To Launch this shell script, I nested it in an Automator App. To not run this App manually, I wrote a small menu bar app, AutoRun, that would open my Automator App every hour. This is the result:
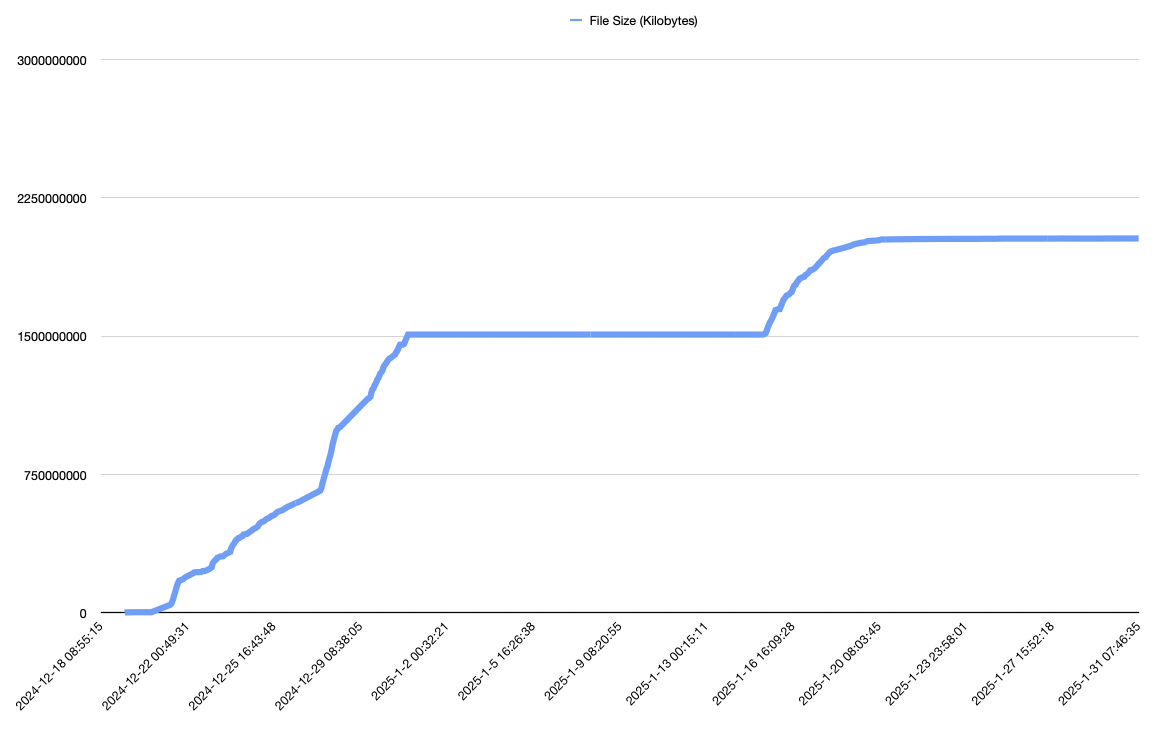
It took about 40 days to download my photos. I have a Gigabit Fibre optical connection. If I had a direct connection to Apple, it could have taken 4,5 hours.
-
Developing: AutoRun
I wanted to find out how long it takes to download my 2TB photo library from iCloud. To do that I wanted to monitor the file size of the library. I created a short shell script and packaged it using automator into an app. Unfortunately I had to run it manually to create a data point. I researched different options to run apps regularly in macOS
1. Launch Agents (Using
launchd)- Description: The
launchdservice allows you to create and manage a Launch Agent (a.plistfile) to schedule app launches or background tasks. These files are stored in~/Library/LaunchAgents. - Disadvantages:
- Requires knowledge of XML-based
.plistsyntax. - Debugging errors can be difficult without proper tools.
- Changes require reloading or restarting the
launchdservice.
- Requires knowledge of XML-based
2. Cron Jobs (via
cron)- Description: Although deprecated in favor of
launchd, cron is still available for scheduling recurring tasks via thecrontabcommand. - Disadvantages:
- Requires familiarity with the
cronsyntax and terminal usage. - May not handle macOS-specific contexts (e.g., GUI applications) well.
- Deprecated, so it might lack support in future macOS versions.
- Requires familiarity with the
3. Automator
- Description: Automator allows users to create workflows or applications that can be scheduled via Calendar or saved as login items.
- Disadvantages:
- Limited control over advanced scheduling options.
- Some tasks may require additional scripting, which can increase complexity.
- Less flexible than scripting-based solutions for complex needs.
- Calendar items can only be repeated daily – not every hour.
4. Login Items
- Description: Apps can be added to “Login Items” in System Preferences to launch automatically upon user login.
- Disadvantages:
- Only triggers on user login, not suitable for recurring tasks at specific times.
- Maintenance can be cumbersome if managing multiple apps.
5. Shell Scripts and Scheduled
atCommands- Description: Scripts can be written to launch apps and scheduled using tools like
ator triggered manually. - Disadvantages:
- Requires scripting knowledge and familiarity with the command line.
- Limited scheduling capabilities compared to
cronorlaunchd. - May lack robustness for recurring tasks.
Non of these were easy to use and easy to maintain. So I started the development of my own solution: AutoRun.
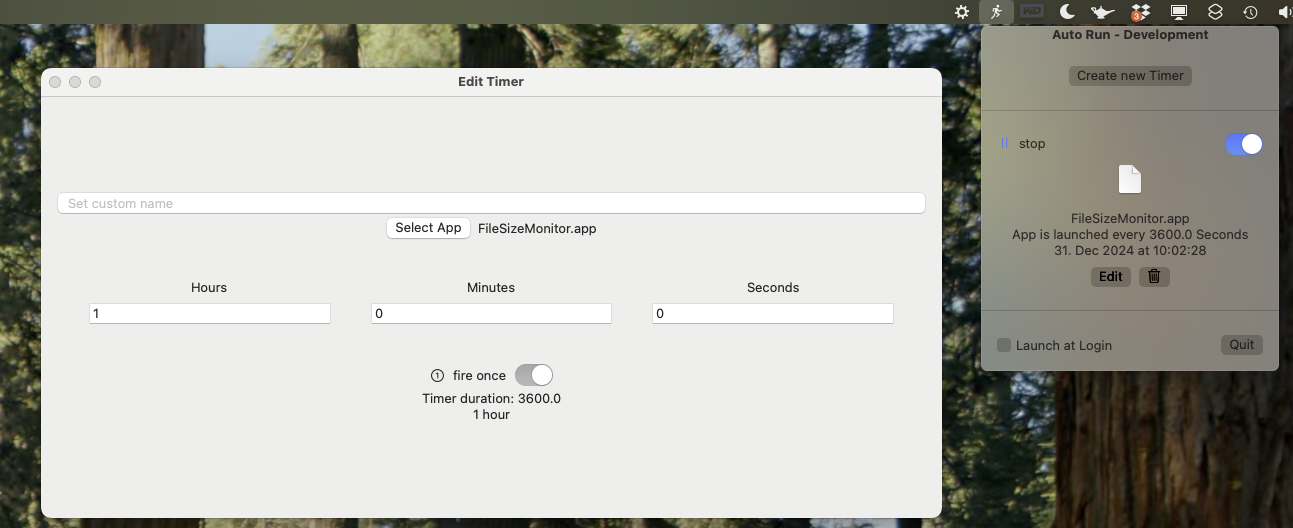
Early screenshot of AutoRun It’s currently in a prototype phase. No design work has been done. It’s only a proof of concept to see if this works. You can download the source code and a compiled app at GitHub.
- Description: The
-
Streamingdienste in Deutschland
Um PENGUIN und Dune 2 zu gucken habe ich mir für einen Monat wow (Sky/Premiere/DF1) geklickt. Da die Bildqualität, verglichen mit dem was ich von anderen Diensten gewohnt bin, unter aller Sau ist (kein 4K, schlechte Bitrate,…) habe ich hier mal eine kleine Aufstellung mit einigen (nicht allen) Diensten, deren Bildqualität und Anzahl der Inhalte. Das sagt nichts über die Qualität der Inhalte aus. Falls Fehler in der Tabelle sind, gerne in den Kommentaren vermerken und ich korrigiere das. (Alles Stand November 2024)
Streaming-Dienst Standard-Auflösung Standard-Bitrate Preis (Standard) Kosten für Upgrade auf 4K Filme & Serien verfügbar Netflix Full HD (1080p) 3-5 Mbit/s 12,99 €/Monat 6,00 € zusätzlich (Premium-Tarif) 4.000+ Filme, 2.500+ Serien Amazon Prime Video Full HD (1080p) 5-10 Mbit/s 8,99 €/Monat Kein Upgrade nötig 24.000+ Filme, 2.000+ Serien Disney+ 4K UHD 15-25 Mbit/s 8,99 €/Monat Kein Upgrade nötig 500+ Filme, 350+ Serien Sky/Wow 720p 3-5 Mbit/s 9,99 €/Monat nicht verfügbar.
1.000+ Filme, 200+ Serien YouTube Full HD (1080p) 1-3 Mbit/s Kostenlos (mit Werbung) 11,99 € (YouTube Premium für 4K-Qualität ohne Werbung) Nicht spezifiziert ARD/ZDF Mediathek Full HD (1080p) 2-4 Mbit/s Kostenlos (via Rundfunkbeitrag) Keine 4K-Unterstützung 250.000+ Inhalte (übergreifend) Paramount+ Full HD (1080p) 4-8 Mbit/s 7,99 €/Monat Kein Upgrade nötig 500+ Filme, 200+ Serien -
Gridfinity x EOS R8
While looking for a good way to organise my camera gear inside a IKEA Kallax shelf, I was pointed by Chris Marquardt to gridfinity. Gridfinity is an open source system of grids which are used as a base to place containers and other elements to store items. Thanks to the community, there are already grids available in the format of Kallax drawers. For Autodesk Fusion 360 (free for personal use), there is even a plugin that can generate Gridfinity elements.
Equipped with this, I got to work and designed suitable inserts for one of my cameras, the Canon EOS R8. I currently only have a 50mm lens for the camera. However, since I plan to buy a zoom lens in the near future, I wanted to keep the area modular, so I don’t have to reprint everything if I decide to use a different lens with the camera. I used my 3D scanner to scan the camera and create the inserts for it. I used the split line between two grids as center line for the lens. The center axis of the lens is 45mm above the upper face of the base grid. I ended up with the design shown below.
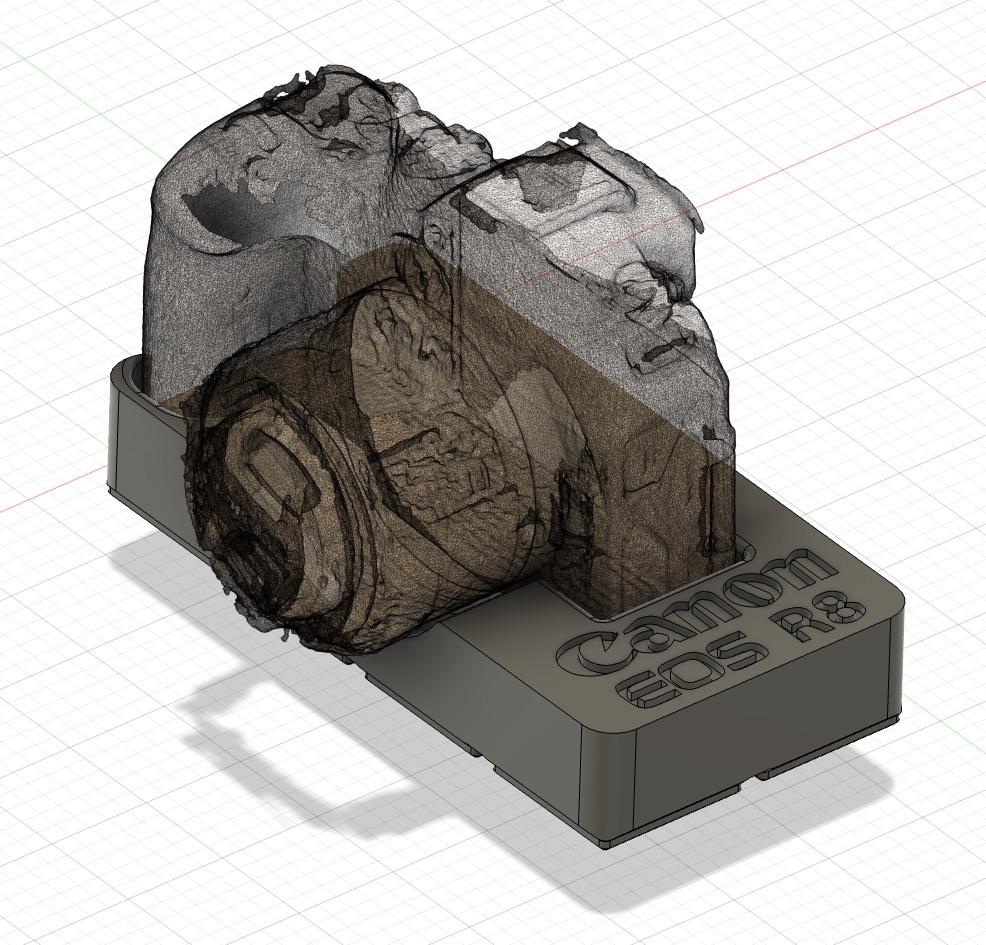
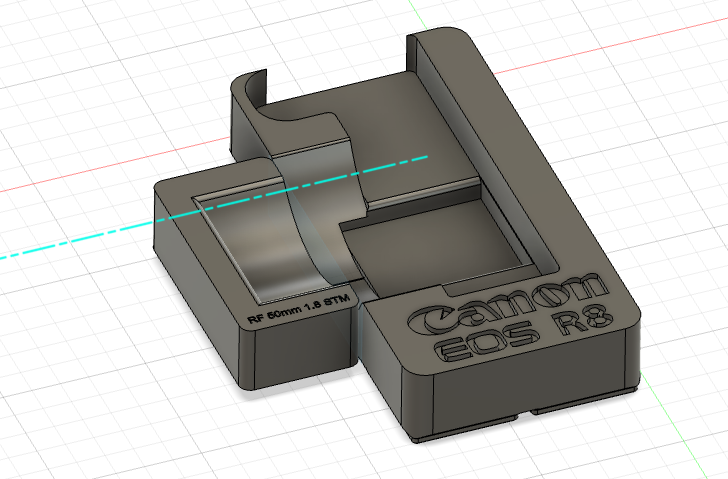
I added additional elements for the charger and some filters. I’ve uploaded some of the to thingiverse:
- Canon EOS R8 Gridfinity base
- Canon RF 50 1.8 STM Lens holder
- Canon LC-E17E Battery Charger holder
- HOYA Filter holder (55mm)
I’m planning to also create cradles for my EOS M System (2 Bodies, several lenses), my old EOS System and my compact cameras. But this will take a while.
-
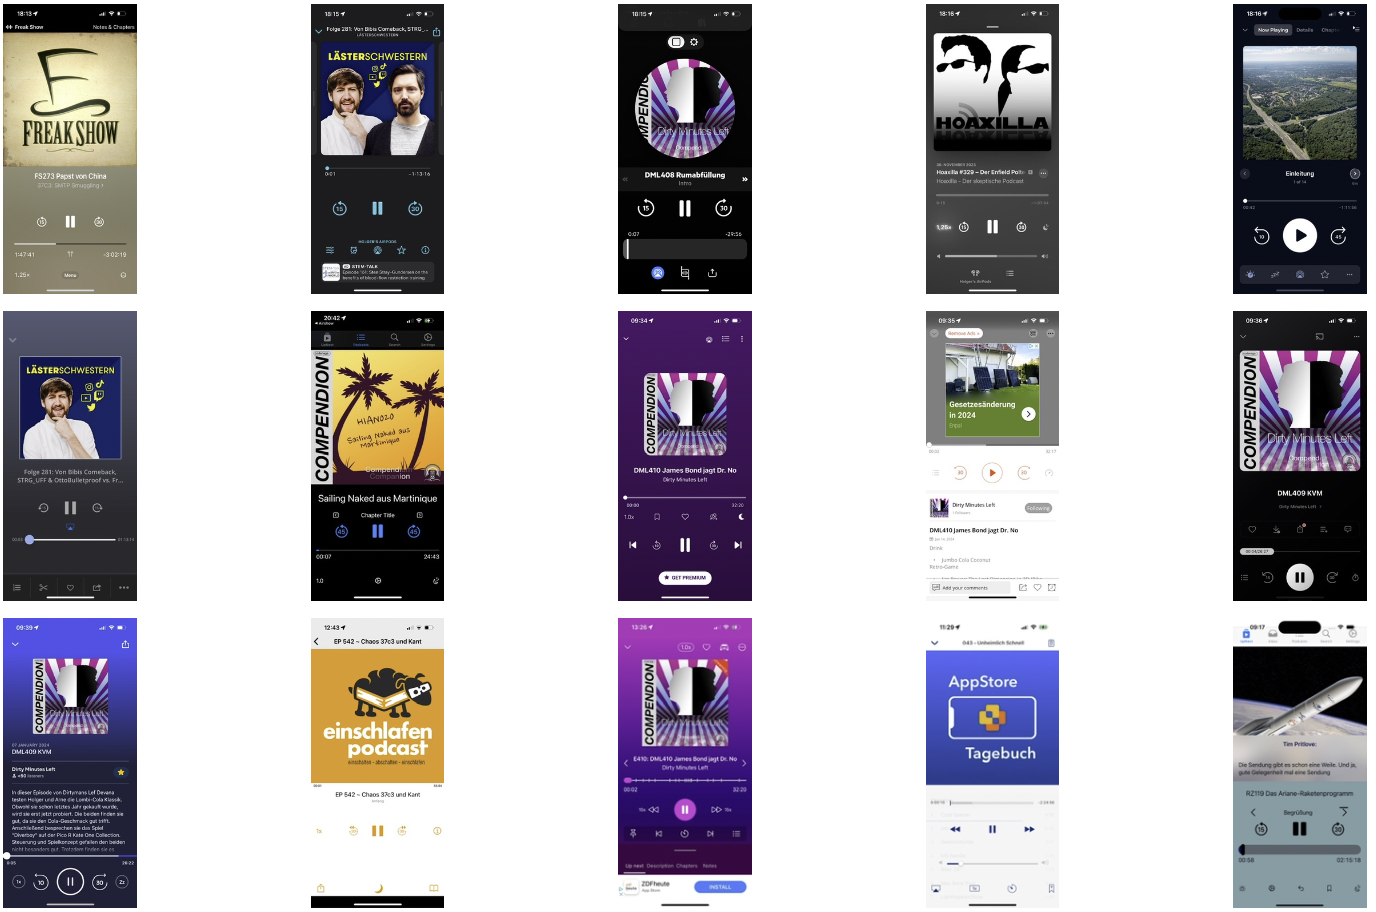
Play now Screens
I’m working on a new Podcast app. It all started when my favourite podcast app stopped working. The app relied on a server to work and the company that owned the app (it has been sold in the meantime) was not able to maintain the server when problems occurred. Even basic functions, like exporting the list of subscriptions, were relying on the server connection. As I loved the features of that app and the uncertain future of it made me start developing my own app. As there are already a lot of apps existing, I have the opportunity to compare what other developers are doing and get inspired for my own app.
When designing an app, besides selecting the set of features that should be implemented, a big decision ist on designing the user interface. The “play now screen” the screen that shows the player controls when the app is in foreground is one of the most important screens of a player app. Let’s have a look at the new screen I designed for my app. Some items will still change in the future, but I think it’s good to discuss my thoughts when designing the interface:
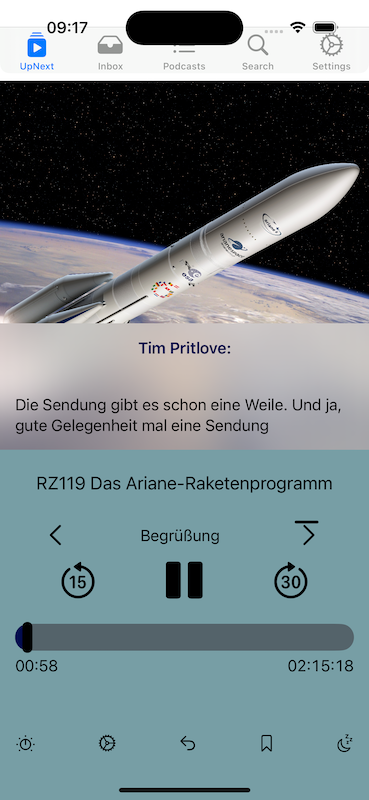
The now playing screen shows the cover art of the episode on the top. A big portion of the screen is dedicated to this. A lot of podcasters spend time designing and selecting special art for each episode. By giving the cover that much space, I hope the user has a similar feeling as people have when holding big vinyl covers.
The app supports some podlove features. This includes transcripts. If an episode contains a transcript as vtt file. Its content is loaded and can be seen during playback overlayed on the cover art.
The app also supports chapter marks. At the moment of writing this, podlove simple chapters as part of the feed, and mp4 chapters are supported. I’m working on mp3 chapters as well. In addition, some podcasters don’t put proper chapter marks, but list them in their show notes. These are extracted and can be also used to skip chapters. The ‘next chapter’ button contains a progress bar going around the chapter and showing when this chapter is ending.
The duration for the seek forward and backwards buttons are individually adjustable.
The bottom row of icons will be consolidated in the further development. I will explain the function of these icons in a separate posting.
-
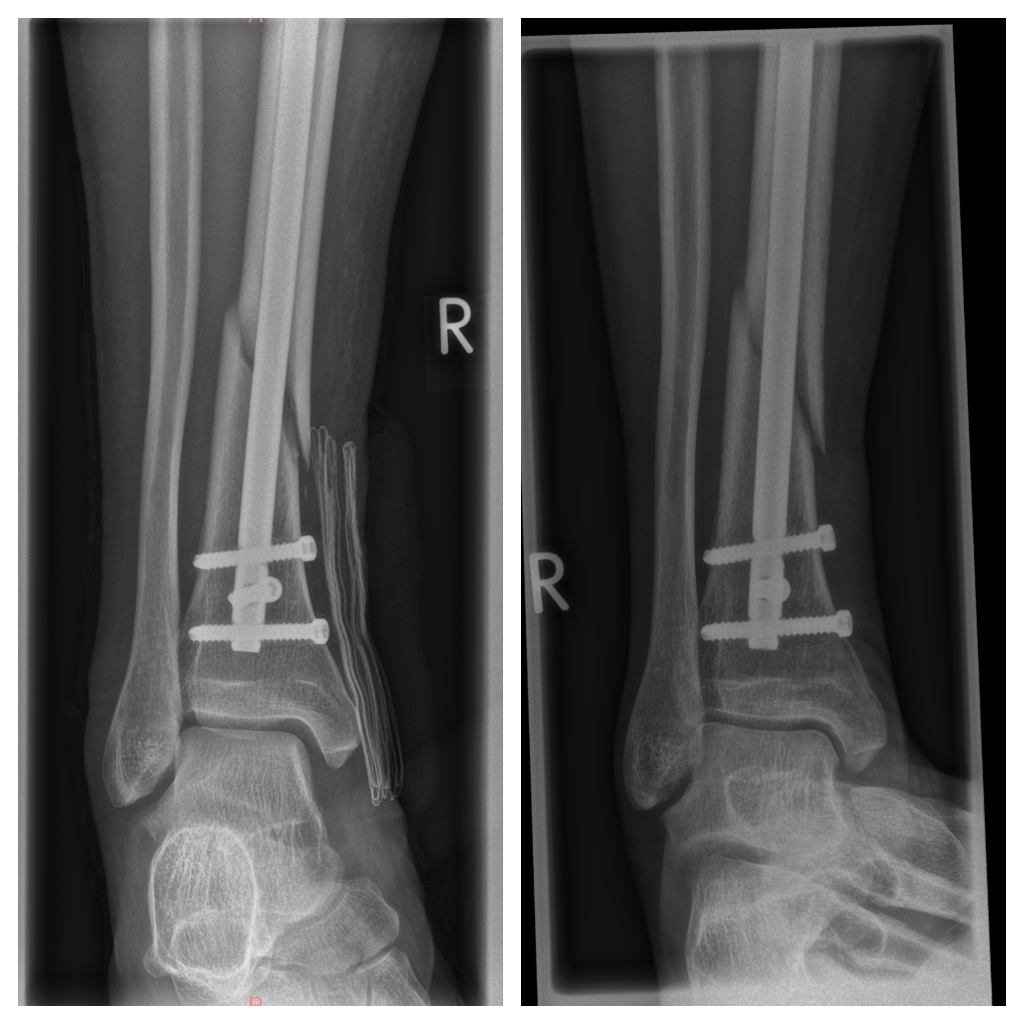
Kallusbildung
Vor 14 Wochen habe ich mir das Bein gebrochen. Inzwischen kann ich wieder ohne Krücken gehen, das Fußgelenk schmerzt noch ab und zu etwas und Sport würde ich auch noch nicht machen, aber gehen funktioniert. Das aktuelle Röntgenbild zeigt außerdem auch eine Kallusbildung. Das ist sehr gut. Vermutlich kann auf eine weitere Operation zur Dynamisierung verzichtet werden.
Der Bruch nach 14 Wochen. -
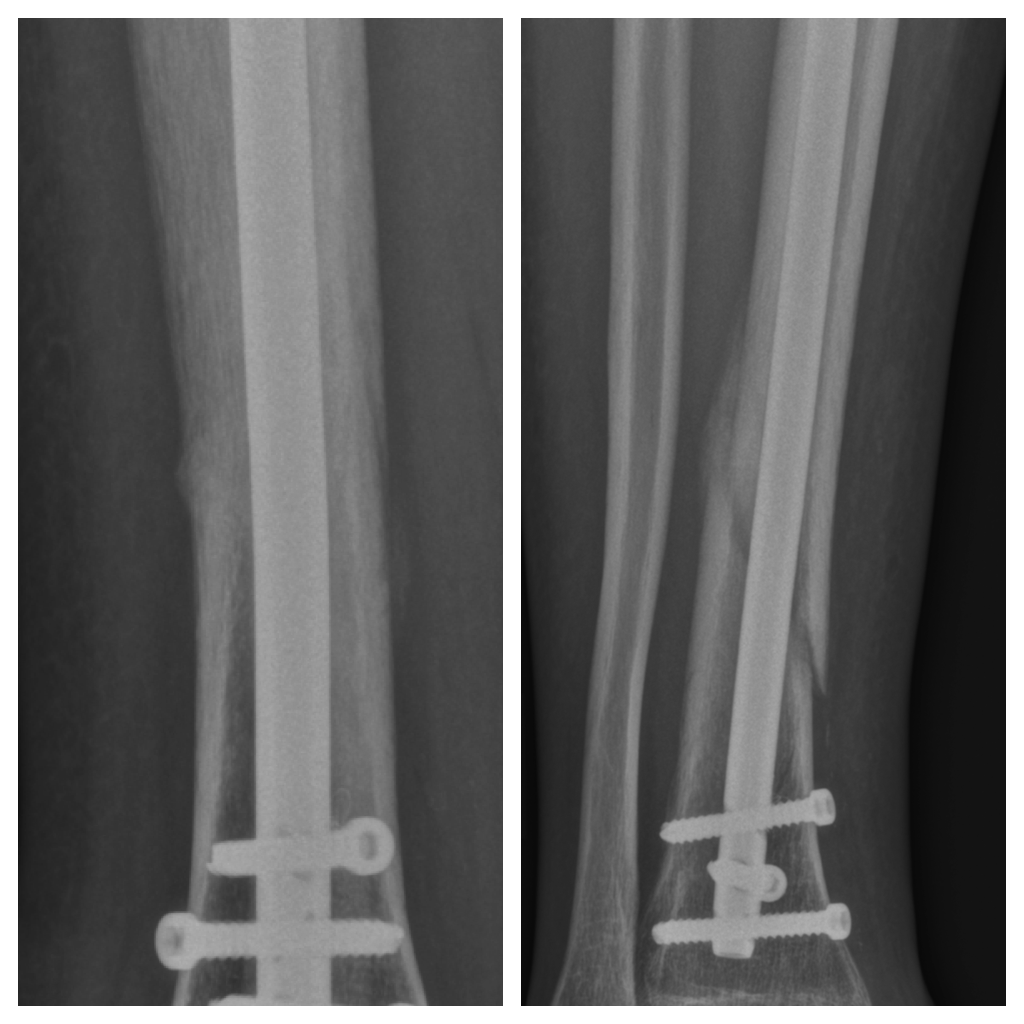
9 Wochen gebrochenes Bein
Vor genau 9 Wochen habe ich mir das Bein gebrochen. Inzwischen bin ich auf den Krücken ganz gut unterwegs. Bis dato sollte ich das Bein nicht, bzw. nur mit max 10kg belasten. Welche Auswirkungen eine höhere Belastung hätte, habe ich Vergessen zu fragen. Nach einer neuen Röntgenkontrolle, bei der der Radiologe von einer zunehmenden Unschärfe schrieb, war ich heute bei einer Orthopädin, die auf den Röntgenbildern keine Heilung sehen konnte. Sie war auch von der Tatsache, dass ich das Bein noch nicht belasten soll geschockt. Belastung des Beins sei wichtig. Daher soll ich jetzt mit 20kg oder gar bis zur Schmerzgrenze belasten. In der Praxis habe ich schon das halbe Körpergewicht auf das Bein verlagert, ohne dass es zu Schmerzen kam. In vier Wochen soll es eine neue Kontrolle geben. Ich bin gespannt. Vielleicht hätte ich eher zu dieser Orthopädin gehen sollen.
Röntgenbilder: links: direkt nach der OP, rechts: 8 Wochen später